
If you are looking to save money and be more self-sufficient you might want to consider how to make banana flour and how to use it. Imagine the freedom of growing your own flour in the form of easy, no-hassle banana trees!
How to Make Banana Flour and How to Use It
- Harvest at least 20 fingers of green or ripe bananas
- Wash off any debris or stains
- Pat dry
- Slice thinly and evenly
- Dry thoroughly in a dehydrator or naturally
- Grind into a fine powder
- Use as needed, or
- Package and store the flour in an airtight container
- Label the container with the date when it was made
First Step to Make Raw Banana Flour at Home
In Jamaica, banana trees are almost as common as grass. Even the gated communities boast backyards with a clump or two of the plant. But how do you get from the bunch of bananas to a flour you can actually cook with?
Well, the first thing you need is the bananas!
Green bananas are ready around 3 months after first flowering. Ripe bananas are more obvious to harvest- you just look for the yellow colour!
After removing any webs or bugs (which are not a bad thing to see if you grow your bananas organically) wash off any stains and pat them dry.
Now it’s time to slice your bananas.
If you are using green bananas, you can slice them with the skin on. The skin will add to the flour too.
If you choose to use them ripe, by all means peel them – they are way easier to peel anyway!
Ideally you want your banana slices to be as thin as possible.

If you plan on using a dehydrator for the drying phase, it is best to make the slices uniform in size and thickness. This ensures the slices will dry evenly.
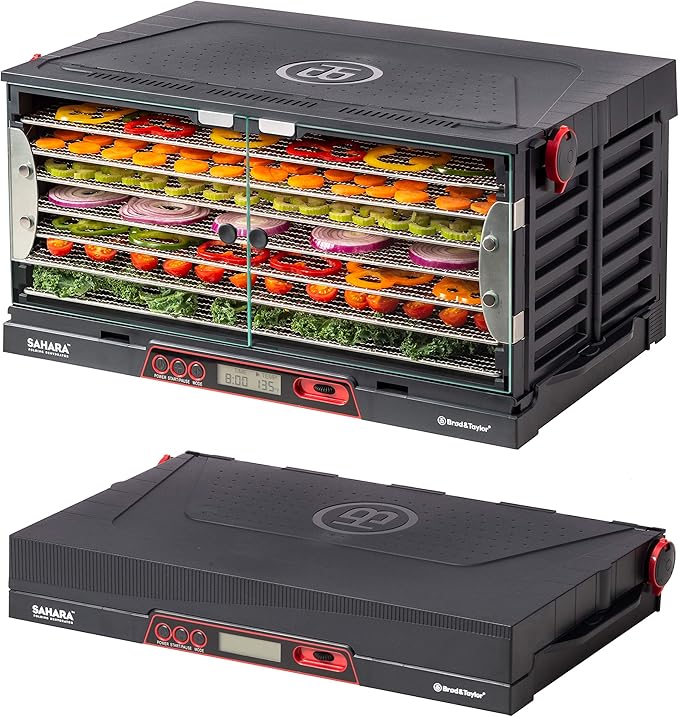
It might not matter much if you will be air/sun-drying them, though. You just need to lay them out on your trays and turn them every half hour. Turning the banana slices makes sure both sides are drying properly.
By the way, you can slice them with a knife too!
The natural way of dehydrating can take around three days in total. The slices will look a bit yellowed if they are really dry.
Otherwise, you can put them out in the sun for as long as you might need to. Things like the humidity and weather conditions will affect how long sun-drying will take.
Time to Grind the Bananas
At this point, once you have dried your banana slices, it is time to grind them into the banana flour.
For this you have a few options: electric, manual, cast iron, stainless steel; blenders, food processors, you name it.
I have used the Piteba manual oil express with the D2 cup for flour grinding.

It really works! Once, I managed to make a tablespoon of banana flour with it as an experiment!
I also like this one:
 It is cast iron and looks really rugged.
To be honest, I am a fan of anything in stainless teel, cast iron and wood. But like I said, you’ll find many options on Amazon.
Your freshly grounded banana flour should look smooth like…well…flour. It really does! If you find it isn’t fine enough you can pass it through your grinder a couple more times to make it free of clumps. After that, feel free to sift it if it’s still feeling or looking coarse.

How to Store Banana Flour
Banana flour is best stored in air-tight containers such as zipper plastic bags, stainless steel containers, jugs, jars, whatever.
 Importantly, the key you must remember is “air-tight”.
Air-tightness (is that a word?) is important to prevent spoilage such as from mold. There is nothing a fungus loves more than warm, moist flour.
If you intend to use just the dry flour that won’t be such a good thing. At the same time, if you’re aiming for a sourdough starter, it’s all-good!
It is also a practical idea to label your banana flour storage container with the date when you made it. As it regards an expiration date, you might find it starting to go bad after 1 or even 2 years if it is sealed and stored in a cool, dry environment.
After you open it, though, you might want to use it within 6 to 12 months.
Which is why it’s probably worth investing in something that you can use to make your own fresh flour right when you need it, or maybe for a week at a time.
Fresher is always better to help you get the most out of the nutrients. As a matter of fact, storage generally depletes the nutrient content of flour.
What can Banana Flour be Used For?
Banana flour is a gluten-free flour. It can be mixed with wheat flour or used on its own.
Some uses include:
- A thickening agent for baby formula, soups, sauces and porridges
- Raw banana flour can be added as is to cereals and smoothies.
- Used to make pancakes, brownies, bread and fritters.
In fact, I grew up seeing my parents and grandma make banana flour dumplings! These were boiled just like wheat flour dumplings, although I think they were still mixed with a little wheat flour to help them stick together. Other options for a binder include xanthan gum or chia seeds to help hold your banana flour together.
 One main difference you’ll want to keep in mind is that banana flour absorbs more water than wheat flour. That means you’ll need to incorporate less of it in recipes that are based on wheat flour.
Does banana flour taste like bananas?
Fortunately, (or unfortunately, depending on what you’re aiming for) banana flour has only a slight hint of banana flavor.
This goes neutral once it’s cooked.
You can also manage the banana flavour by mixing your banana flour with other types of flour (like coconut flour, almond flour, or even cassava flour).
Simple green banana flour recipes
Of course, this post would not be complete without recipes showing you how to use your green banana flour, so here is one for you to try!
Green Banana Flour Pancakes
Ingredients:
1 cup green banana flour
2 eggs
1 cup milk (or dairy-free alternative)
1 tsp baking powder
1 tbsp honey or maple syrup
½ tsp cinnamon (optional)
1 tsp vanilla extract
Butter or oil for cooking
Instructions:
In a bowl, whisk together eggs, milk, honey, and vanilla.
Add green banana flour, baking powder, and cinnamon. Mix well until smooth.
Heat a pan over medium heat and grease with butter or oil.
Pour small amounts of batter onto the pan and cook until bubbles form, then flip.
Serve warm with fruits or syrup.

